|
modl.ai
|
|
modl.ai
|
The modl:test Unity GUI Explorer is an Exploratory Bot for interacting with 2D elements in Unity projects. It is useful for checking that UI elements present in Unity are functional.
The Unity GUI Explorer needs a lightweight integration into your Unity project to function.
The Unity GUI Explorer works by interacting with Unity 2D elements that are present in-scene at run-time and sending simulared virtual clicks, taps, drags, and swipes to the game.
At run-time, whenever it needs to take an action, the Unity GUI Explorer checks what is currently in the scene and choses the next element to interact with, relative to what it has already interacted with.
By keeping a record of what it has interacted with, and their relationships, the Unity GUI Explorer can help you cover most of your UI elements, verifying that they work and and uncovering functional issues. It can be coupled with modl:test video analysis to expose the views in a game and find issues that only present themselves visually.
The Unity GUI Explorer consists of a number of libraries, scripts and prefabs, bundled in a Unity Package. It can be added by installing the ai.modl.engine UnityPackage.
Add the ai.modl.engine.unitypackage file to your project. All modl.ai assets will be placed in a folder in Assets called ai.modl.engine@version_number. If you want to remove the plug-in again, simply delete this folder.
The modl.ai GUI Explorer remains passive unless it is enabled explicitly by adding two Unity scripting defines to your player settings. The two scripting defines are called MODL_AUTOMATIC_TESTING and MODL_OBSERVATION_ONLY.
You can turn these scripting defines on and off, and by extension the modl.ai GUI Explorer, using two toggle items in the Unity menu bar.
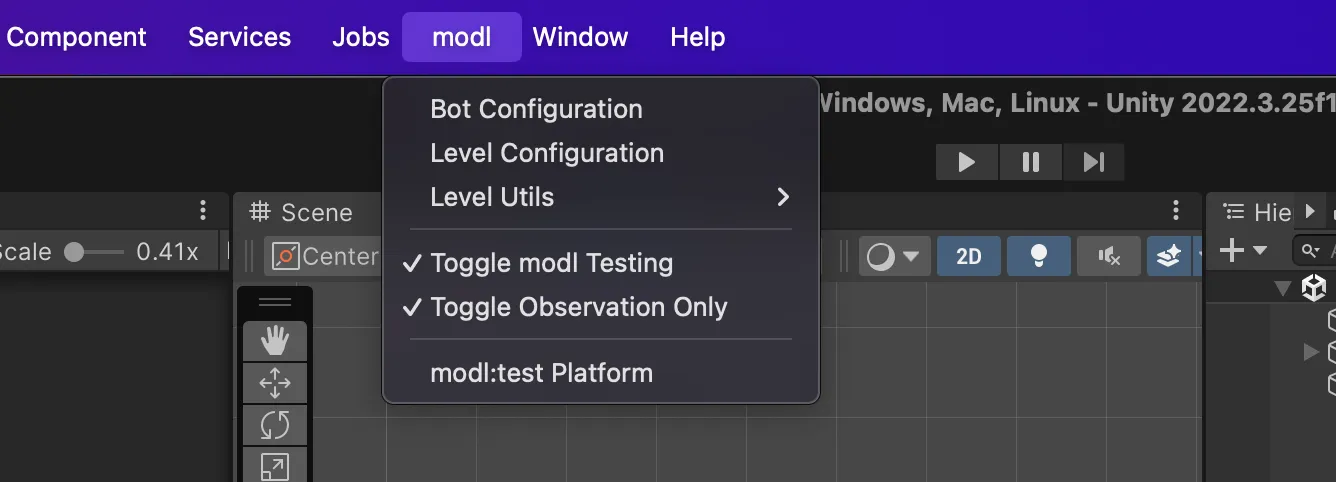
If these two menu items are checked, the modl.ai GUI Explorer will start automatically once the game starts running.
When you start your game with the modl.ai GUI Explorer enabled, the GUI Explorer will automatically start with the first scene that is loaded.
The plug-in spawns two objects that are persistent across scenes, the Modl.ModlUIClicker and Modl.UITesting.ModlVirtualMouse.
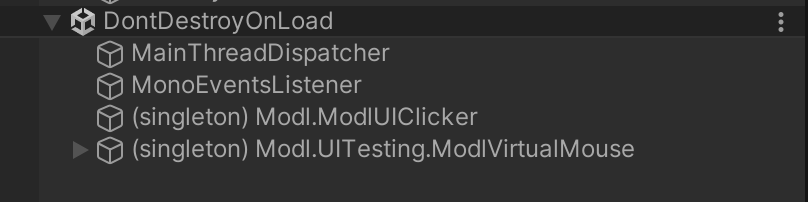
If you can see these two objects in the scene, the GUI Explorer has loaded.
Next, you should be able to observe the GUI Explorer interacting with any UIElements present in the scene. If there are no UIElements, the modl.ai GUI Explorer does not take any actions, but intermittently cheks if any have appeared, and will start actinh once any appear.
The Unity GUI Explorer will try to interact with any UIElement it can find and access in the Unity scene when it makes a decision. However, sometimes you might want it to interact with certain types of elements first.
The modl.ai Unity plug-in package contains an empty script called PopUp.cs. If you add this as a component to a UIElement, the GUI Explorer will start from these elements before considering others. This can useful if you have many different elements and want to ensure the GUI exploration process starts with certain elements.
You can change or extend the GUI Explorer to interact with other elements than UIElements. In order to do this, you can customize ModlUIClicker.cs, which you can find in ai.modl.engine/AppCrawler/.
ModlUIClicker.InteractWithCurrentElement(UIElementNode Current) is responsible for performing the actual interaction with a given UI element, depending on its type. For each type, the ModlUIClicker has a defined interaction. To change or extend it, you can add your own base type, and map subtypes to the appropriate interaction.
The GUI Explorer goes through 5 steps when exploring the game UI:
GetUIElements() to find all interactive elements.InteractWithCurrentElement() to perform the interaction.WaitWhileDetectingUIElements() to wait for the UI to stabilize.Each step is outlined with the associated lines of code below:
Calls GetUIElements() to find all interactive elements.
private IEnumerable<UIExploration.UIElement> GetUIElements()
{
    var elements = new List<UIExploration.UIElement>();
    elements.AddRange(GetUIElementsOfType<IPointerClickHandler>(    UIElementNode.InteractionType.Clickable));
    elements.AddRange(GetUIElementsOfType<IScrollHandler>(    UIElementNode.InteractionType.Scrollable));
    elements.AddRange(GetUIElementsOfType<IDragHandler>(    UIElementNode.InteractionType.Draggable));
    return elements;
}

private static IEnumerable<UIExploration.UIElement> GetUIElementsOfType<T>(    UIElementNode.InteractionType interactionType)
{
    var elements = new List<UIExploration.UIElement>();
    // Search popups first
    var popups = FindObjectsByType<Popup>(FindObjectsInactive.Exclude,     FindObjectsSortMode.None);
    // ... collect elements from popups and root objects
}
Selects the next element to interact with. This happens in the UIExploration class's ExploreUI() method (which is called from Start)
modlVirtualMouse.StartCoroutine(exploration.ExploreUI(WaitWhileDetectingUIElements,
onExplorationComplete: OnExplorationComplete,
beforeStepCallback: () =>
{
    UIExploration.OutputCoverageFiles(doCSV: true, doCompact: true);
    return null;
}));
Calls InteractWithCurrentElement() to perform the interaction.
private IEnumerator InteractWithCurrentElement(UIElementNode current)
 {
    // Move mouse to target
    const float moveSpeed = 1000f;
    var direction = (current.boundingBox.position - modlVirtualMouse.GetMousePosition());

// ... mouse movement logic ...
// Execute interaction
switch (current.interactionType)
    {
        case UIElementNode.InteractionType.Clickable:
            modlVirtualMouse.PressMouseButtonAt(current.boundingBox.position);
            yield return new WaitForEndOfFrame();
            modlVirtualMouse.ReleaseMouse();
            break;
        case UIElementNode.InteractionType.Scrollable:
            // ... scrolling logic ...
            break;
        case UIElementNode.InteractionType.Draggable:
            // ... dragging logic ...
            break;
    }
}
Calls WaitWhileDetectingUIElements() to wait for the UI to stabilize.
IEnumerator WaitWhileDetectingUIElements()
{
    yield return new WaitForEndOfFrame();
    mousePosition = modlVirtualMouse.GetMousePosition();
    mousePressed = modlVirtualMouse.IsMouseButtonPressed();

    //Wait for Transition.RunFade to finish
    yield return new WaitForSeconds(1.5f);
}
Starts again from 1. Find until:
The OnExplorationComplete() method handles the end of the cycle: